Getting Started
Not sure where to start? Here’s how to get started with Nexus!
If you get stuck with any part of Nexus, we can give you quick and helpful support on our Discord server.
Getting up and running with Nexus is quick and easy, and should only take a few minutes. We’ve prepared this step-by-step guide for you to get stuck straight in to creating an interactive stream for you and your viewers.
Download Nexus
To get started with using Nexus, you first need to download it! If you already have - great - you can skip this step! If not, read on.
Nexus is available across all major operating systems - Windows, macOS, and Linux. Using Nexus requires an active subscription (or a free trial), so you should subscribe through our website to get access to Nexus.
You can download Nexus by going to the download page on our website. We will try and automatically detect your operating system and provide you with the correct download, but you can choose another operating system on the page if you need to.
To install Nexus, do the following:
- Windows: Double-click on
Nexus.exeand click “Run anyway” if prompted - macOS: Double-click on
Nexus.dmgand when prompted, drag Nexus into your Applications folder - Linux: Open the
Nexus.AppImagefile. You may need to runchmod a+x Nexus*.AppImagefirst to add the correct permissions
Launching Nexus For The First Time
Now that Nexus is installed, we can launch it! Find the application called Nexus on your operating system and run it. When running Nexus for the first time, you will be presented with the screen below.
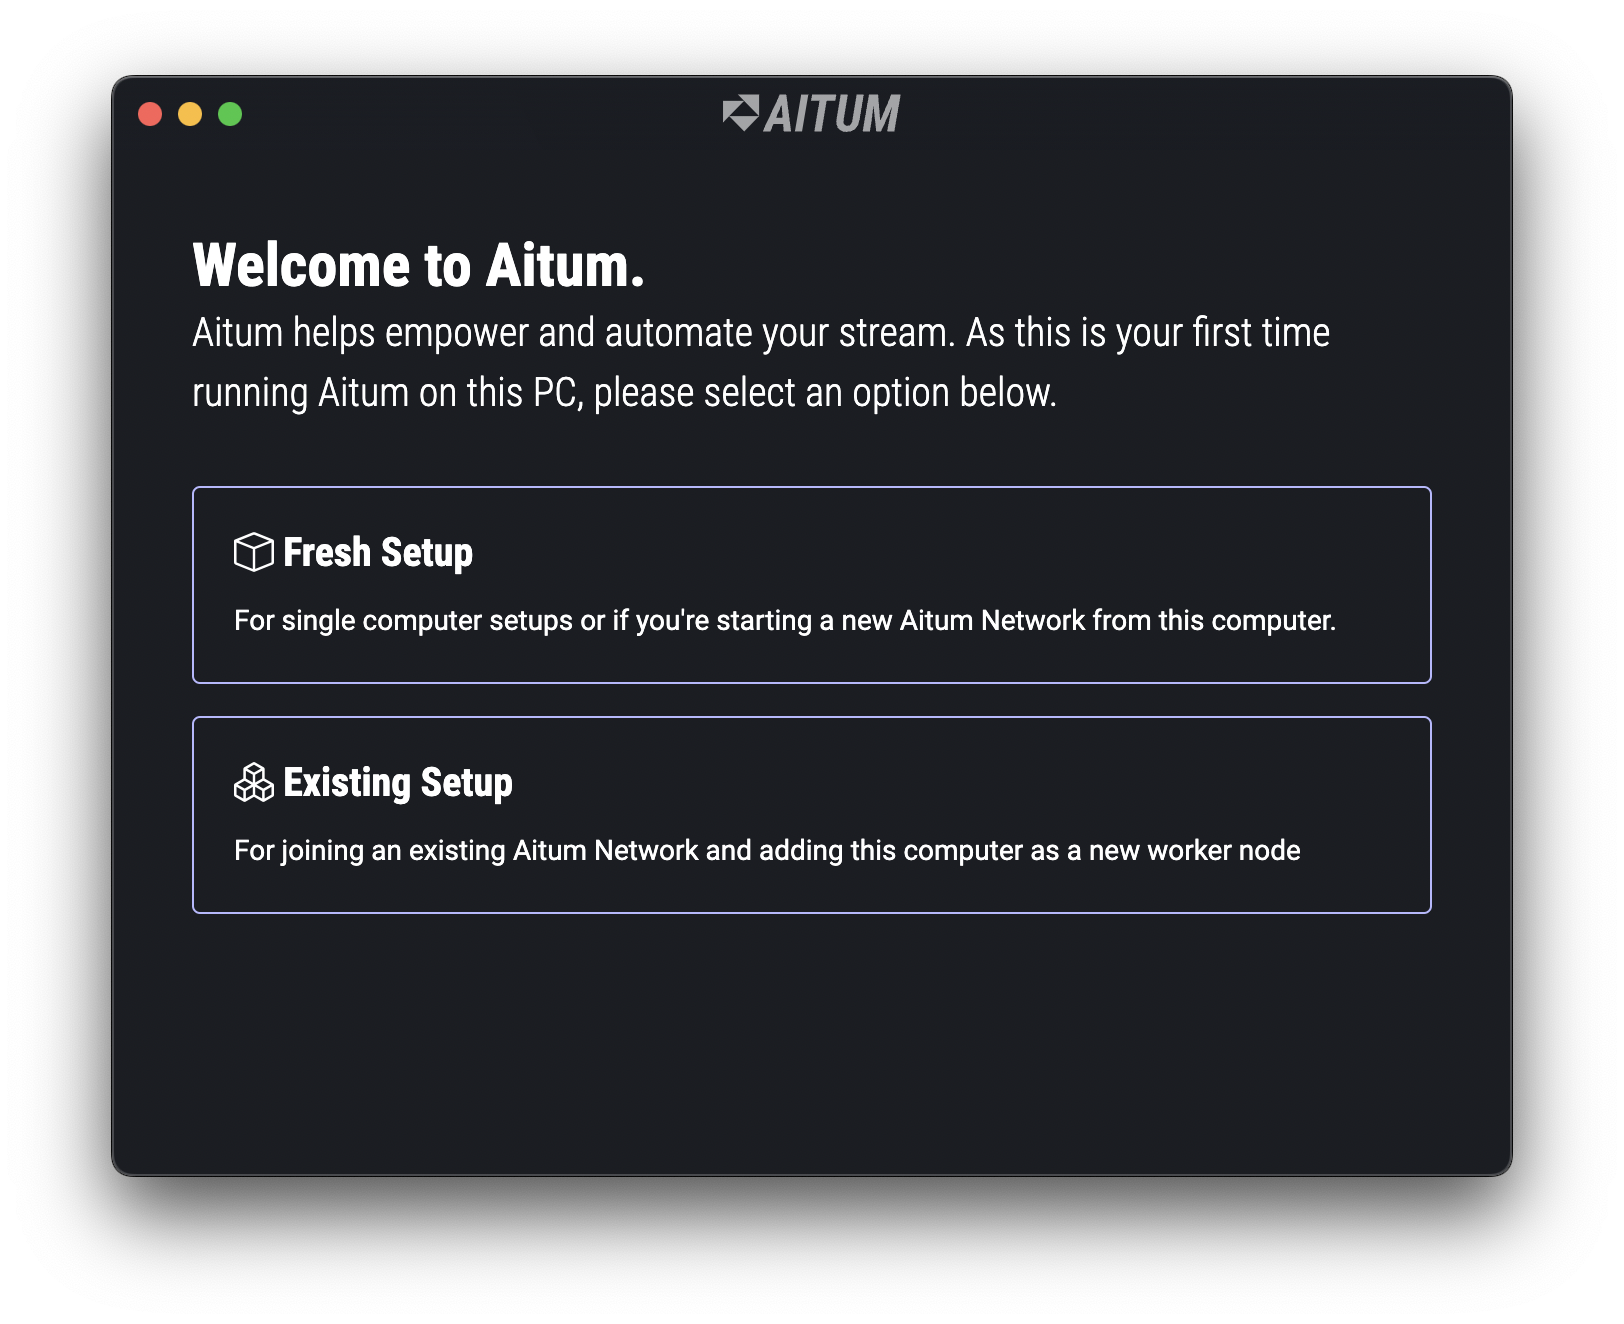
You should click Fresh Setup on this screen, as this is your main computer for running Nexus. You will then be prompted to login to Nexus, which will open a browser window. If you are already logged in to the Nexus website on your browser, this process should take only a couple of seconds. Once you are logged in, Nexus will continue launching and take you to the home screen. If this is your first time, you will be shown a guided tour.
Setting up an integration
Nexus works out of the box without any integrations, and will let you use Twitch / YouTube triggers and actions since you’re already logged in with the service. However, for the purposes of this guide, we also use OBS and would love to set that up too so we can control our scenes.
Now, let’s add our first integration. Head over to the integrations page by clicking on the Settings cog in the top right of Nexus and then Integrations. You will see a page like this:
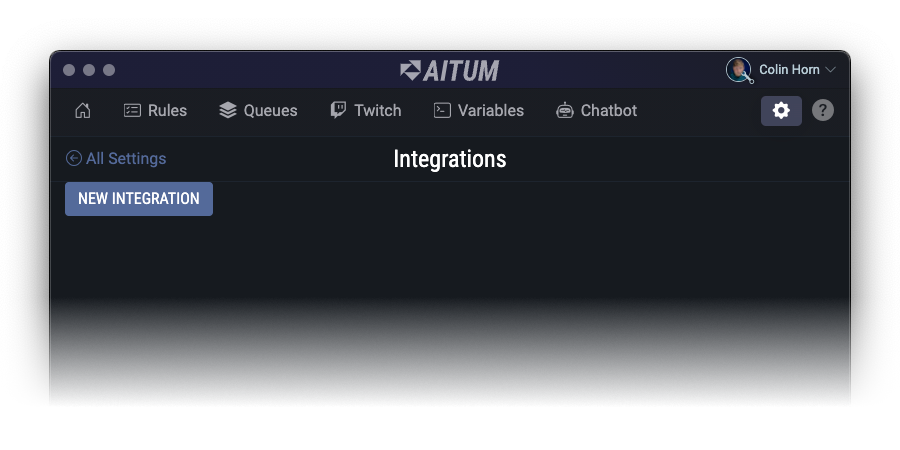
You can click New Integration which will bring up the wizard for creating a new integration. We want to select OBS from the list, and then enter the details we need. If everything is correct, you can save the integration, which should connect to your OBS websocket server.
If you have problems or questions regarding setting up OBS with Nexus, please consult the OBS Page.
Creating Your First Command
Now that we have OBS setup as an integration and it is working correctly, we can create our first command. We’re going to make a simple command for now that fires whenever someone follows our Twitch channel, and sets a text source in OBS so that we can display their name on-screen on our stream.
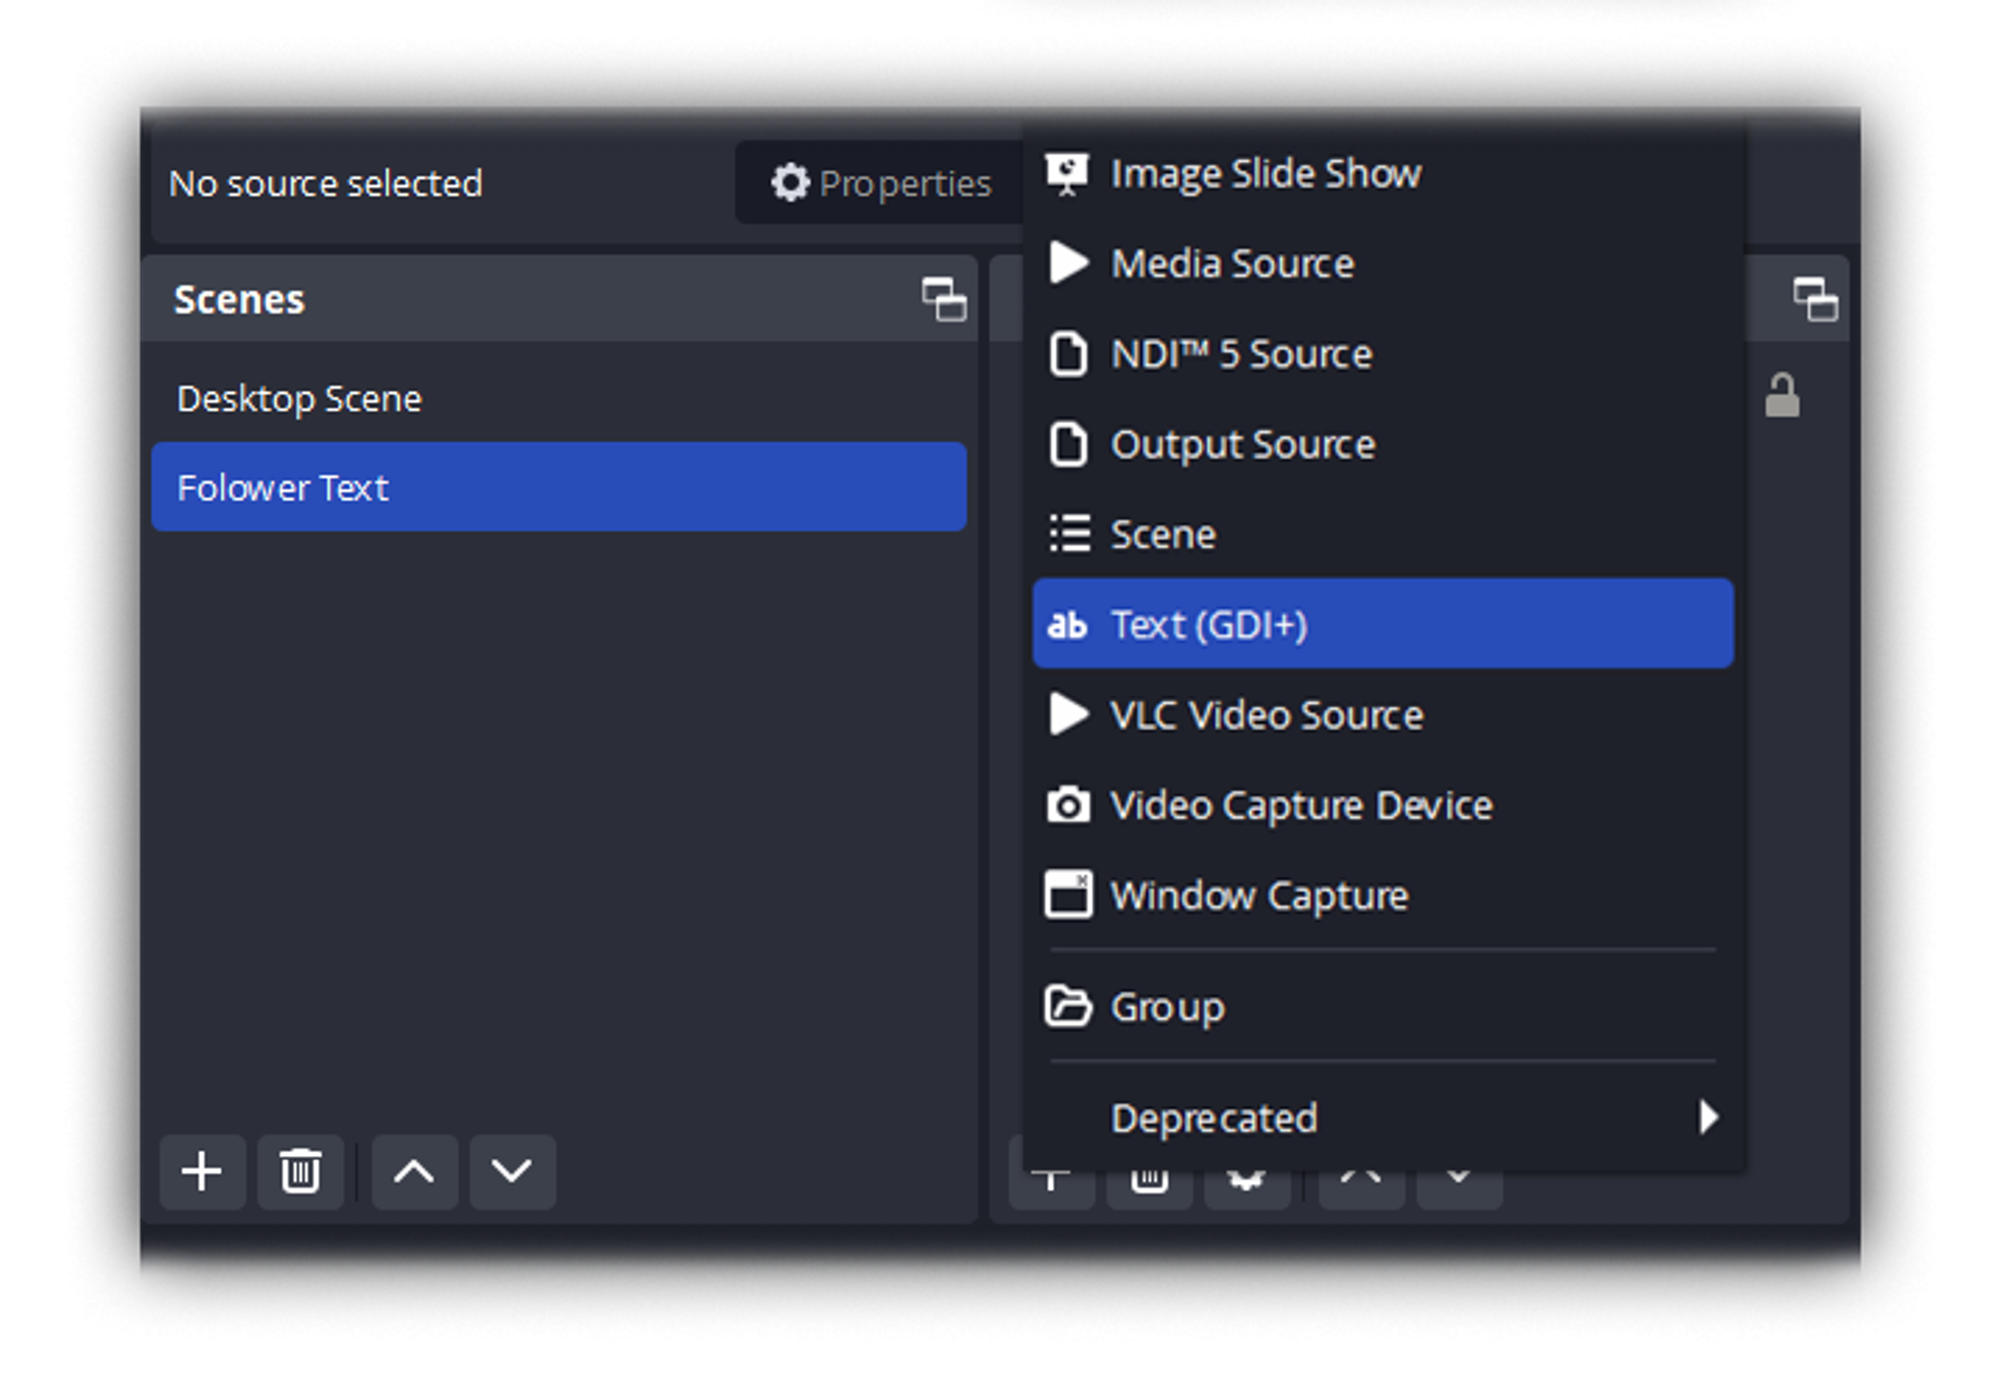
First, create a new text source in an OBS scene.
Next, from the top navigation on Nexus, click the Commands tab. You will see a button called Add Command. Click this button and a new command will be created for us, and we can start adding triggers, checks, and actions. For now, we’re only going to bother with one trigger and one action. Checks are an exciting part of Nexus that allows you to do some very advanced things, but we’re going to keep it short, sweet, and simple for this guide.
Under the Triggers section, click New Trigger. This will display a dropdown menu for selecting a device. Devices in Nexus are a concept describing software or hardware that can be controlled. If you click on the menu, you should see several devices, including Twitch. Select that one, and you will be prompted to select a Trigger Type. Trigger Types are essentially the type of event you’d like to use. From the dropdown menu, select Follow.
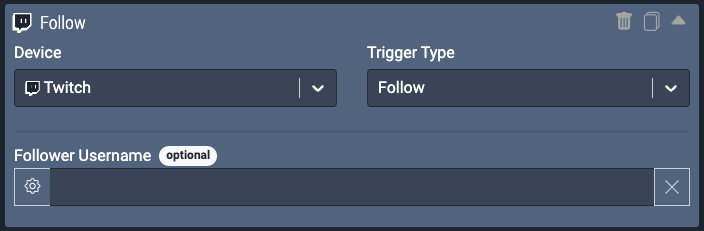
Twitch affiliates and partners have access to triggers relating to subscriptions, bits, channel points, and more. Non-affiliates have a more limited selection.
We could now, if we wanted to, specify a Follower Username. However, this is an optional field, and by leaving it blank, the command will trigger whenever anyone new follows our channel. This is what we want for now, as we want to show the name of whoever just followed us on OBS.
Now, let’s look at the Actions section. Create a new action, and then under the Device dropdown, select your OBS integration. If it is not listed, check that you have configured it correctly. The Action Type we want to use is called Set Text Source Properties. When we select that, we’ll be presented with more options to pick the text source we want to set, and then the text we want to set it to.
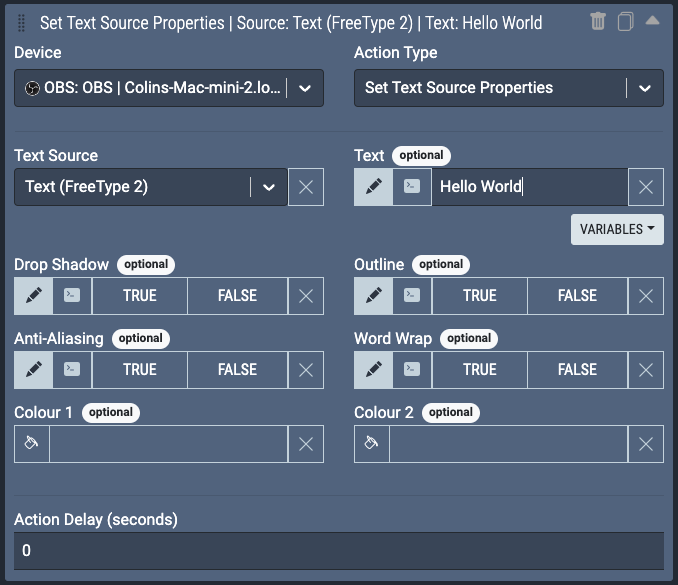
Select the text source we created earlier from the dropdown. In the Text field, enter “Hello world!”. Now, click the Create button at the bottom of the command interface. Congratulations, you just created your first command! Try testing it by clicking the green Test Actions icon at the top right of the command. On OBS, you should see the source text change to “Hello world!”.
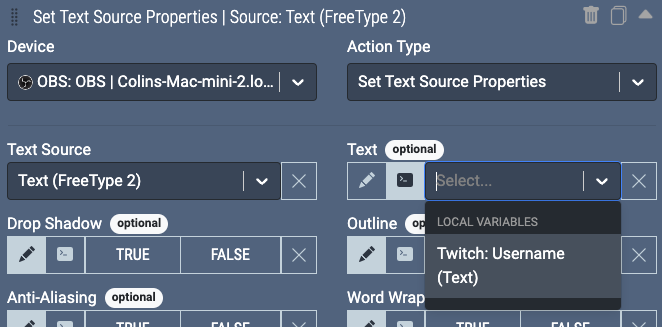
But wait, we’re missing something. At the moment, when someone follows our Twitch channel, the OBS source text is set to “Hello world!”. We need to set this to the username of the person who followed us. This is extremely easy with Nexus. Open up your command and the Set Text Source Properties action again. To the left of the Text field, you can click the variable button and switch the Input Mode to Variable. The dropdown that appears is a list of both local variables and global variables that you can use for this field, instead of typing your own text. Variables that come from triggers in the same command are local variables.
Find the variable Twitch: Username in the dropdown. This variable will be populated with the username of the person who followed us on Twitch.
Now, we can save our command and test it again. If we check OBS, the source text should be Unknown User. That’s because that is the default fallback value for when we don’t know who followed us. You can learn more about fallback values on the triggers page.
Now that we’re setup with an integration and our first command, try it out! Get someone to follow your Twitch account, and watch what happens! Your OBS source text should be changed to the username of the person who followed you.
Final steps
If you’re looking to take a deeper dive into Nexus, we recommend reading more about:
- Commands - Learn more about commands in Nexus, including triggers, checks, actions (including execution types), and Queues.
- Devices - Learn more about all of the devices that Nexus supports, and their triggers and actions.
- Global Variables - Learn more about an advanced feature of Nexus, global variables.
And, if you need any extra support or have any questions, feel free to join our Discord community.